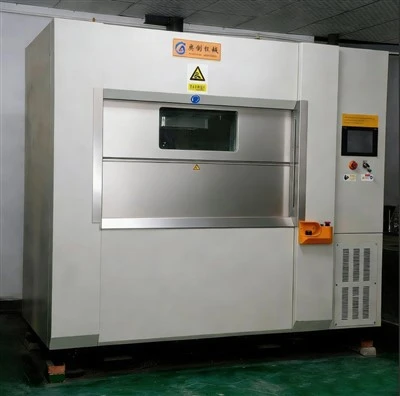
Installing a hot plate welder can be a complex yet rewarding process, especially when you aim to optimize your plastic welding operations. As a seasoned hot plate welder supplier, I've witnessed firsthand how a well - installed hot plate welder can enhance productivity and product quality. In this blog post, I'll guide you through the step - by - step process of installing a hot plate welder, providing insights based on years of experience in the field.
Pre - installation Preparation
Before you even unpack the hot plate welder, several crucial preparatory steps need to be taken. First and foremost, select a suitable location for the machine. The area should be well - ventilated to prevent the accumulation of fumes generated during the welding process. Additionally, ensure that the floor is level and can support the weight of the machine. Uneven flooring can lead to misalignment of the welder components, resulting in sub - optimal welding performance.
Next, gather all the necessary tools for the installation. This typically includes wrenches, screwdrivers, and a measuring tape. Having these tools ready will streamline the installation process and prevent unnecessary delays. It's also a good idea to review the installation manual provided by the manufacturer. This manual contains detailed instructions specific to your hot plate welder model and should be followed closely.
Machine Unpacking and Inspection
Once you've prepared the installation site and gathered the tools, carefully unpack the hot plate welder. Check for any visible damage during transit, such as dents, scratches, or loose components. If you notice any issues, contact the shipping carrier and our support team immediately to resolve the problem. This inspection is crucial as it ensures that you start the installation process with a fully functional machine.
During the inspection, familiarize yourself with the different parts of the hot plate welder. Identify the hot plate, the clamping mechanism, the control panel, and the power supply unit. Understanding the machine's components will make the installation process much easier and help you troubleshoot any issues that may arise in the future.
Electrical and Gas Connections
One of the most critical aspects of installing a hot plate welder is making the correct electrical and gas connections. For the electrical connection, ensure that the power supply voltage matches the specifications of the hot plate welder. Incorrect voltage can damage the machine and pose a safety hazard. It's best to consult a qualified electrician if you're unsure about the electrical requirements.
If your hot plate welder uses gas for heating, such as propane or natural gas, make sure to connect the gas supply properly. Check for any gas leaks using a soapy water solution. Apply the solution to the gas connections, and if you see bubbles forming, there's a leak that needs to be fixed immediately. It's important to follow all safety procedures when dealing with gas connections to prevent accidents.
Mechanical Installation
The mechanical installation of the hot plate welder involves mounting the machine on the prepared floor and aligning the various components. Use the measuring tape to ensure that the machine is centered and level. Tighten all the bolts and screws securely to prevent any movement during operation.
Align the hot plate with the clamping mechanism. This alignment is crucial for achieving consistent and high - quality welds. If the hot plate is not properly aligned, the plastic parts may not be welded evenly, leading to weak joints. Follow the manufacturer's instructions to make any necessary adjustments to the alignment.
Control Panel Setup
The control panel is the brain of the hot plate welder, allowing you to set and control various parameters such as temperature, welding time, and pressure. Connect the control panel to the main machine unit according to the wiring diagram provided in the installation manual.
Once the connection is made, power on the hot plate welder. Calibrate the control panel to ensure that the temperature and pressure readings are accurate. You can use a separate temperature gauge and pressure sensor for calibration purposes. Set the appropriate temperature and time settings based on the type of plastic you'll be welding. Different plastics have different melting points, so it's essential to adjust the settings accordingly.
Testing and Commissioning
After completing the installation and setup, it's time to test the hot plate welder. Start by running a few test welds using scrap plastic parts. Observe the welding process closely to ensure that everything is functioning properly. Check the quality of the welds, including the strength of the joints and the appearance of the weld seam.
If you encounter any issues during the test run, refer to the troubleshooting guide in the installation manual. In some cases, minor adjustments may be required to optimize the welding performance. Once you're satisfied with the test results, the hot plate welder is ready for full - scale production.
Types of Hot Plate Welders You Might Consider
As a hot plate welder supplier, we offer a variety of hot plate welders to meet different customer needs. For example, our Infrared Hot Plate Welding Machine utilizes infrared technology for faster and more precise heating. It's ideal for welding thin - walled plastic parts and provides excellent control over the welding process.
Our Hot Plate Plastic Welding Machine is a versatile option suitable for a wide range of plastic materials. It offers reliable performance and is easy to operate, making it a popular choice among small and medium - sized manufacturers.


If you have high - volume production requirements, our Dual Station Hot Plate Welder may be the perfect solution. This machine allows for simultaneous welding at two stations, significantly increasing productivity.
Conclusion
Installing a hot plate welder requires careful planning, attention to detail, and adherence to safety procedures. By following the steps outlined in this blog post, you can ensure a smooth installation process and get your hot plate welder up and running efficiently.
At [Company], we're committed to providing high - quality hot plate welders and excellent customer support. If you're considering purchasing a hot plate welder, we invite you to [Contact Us]. Our experienced team will be happy to assist you with product selection, installation guidance, and after - sales services. We look forward to partnering with you to meet your plastic welding needs.
References
- Manufacturer's installation manuals for hot plate welders.
- Industry best practices for plastic welding equipment installation.